August 30, 2013

Peaches 'n Cream Pie Cups


This dessert is why I love peach season.  It's similar to a fresh strawberry pie because you make a gelatin to mix with fresh peaches, but this also has a cream layer.  The original recipe was for a full pie, but I like more crust so I came up with these pie cups.  It may seem like a lot of work by the way I wrote my instructions, but they're easy.  Make them on a Sunday afternoon or when you have a little more time.  I hope you like them as much as I do!


RECIPE

1 box prepared pie crusts
1 C. water, divided
3/4 C. sugar
 1/4 C. cornstarch
1/4 tsp salt
2 TBL orange jell-o (powder)
1/4 C. + 1 tsp lemon juice
 6 oz cream cheese
1/3 C. powdered sugar
2 1/2 C fresh peaches- (peeled and cut into bite sized pieces)

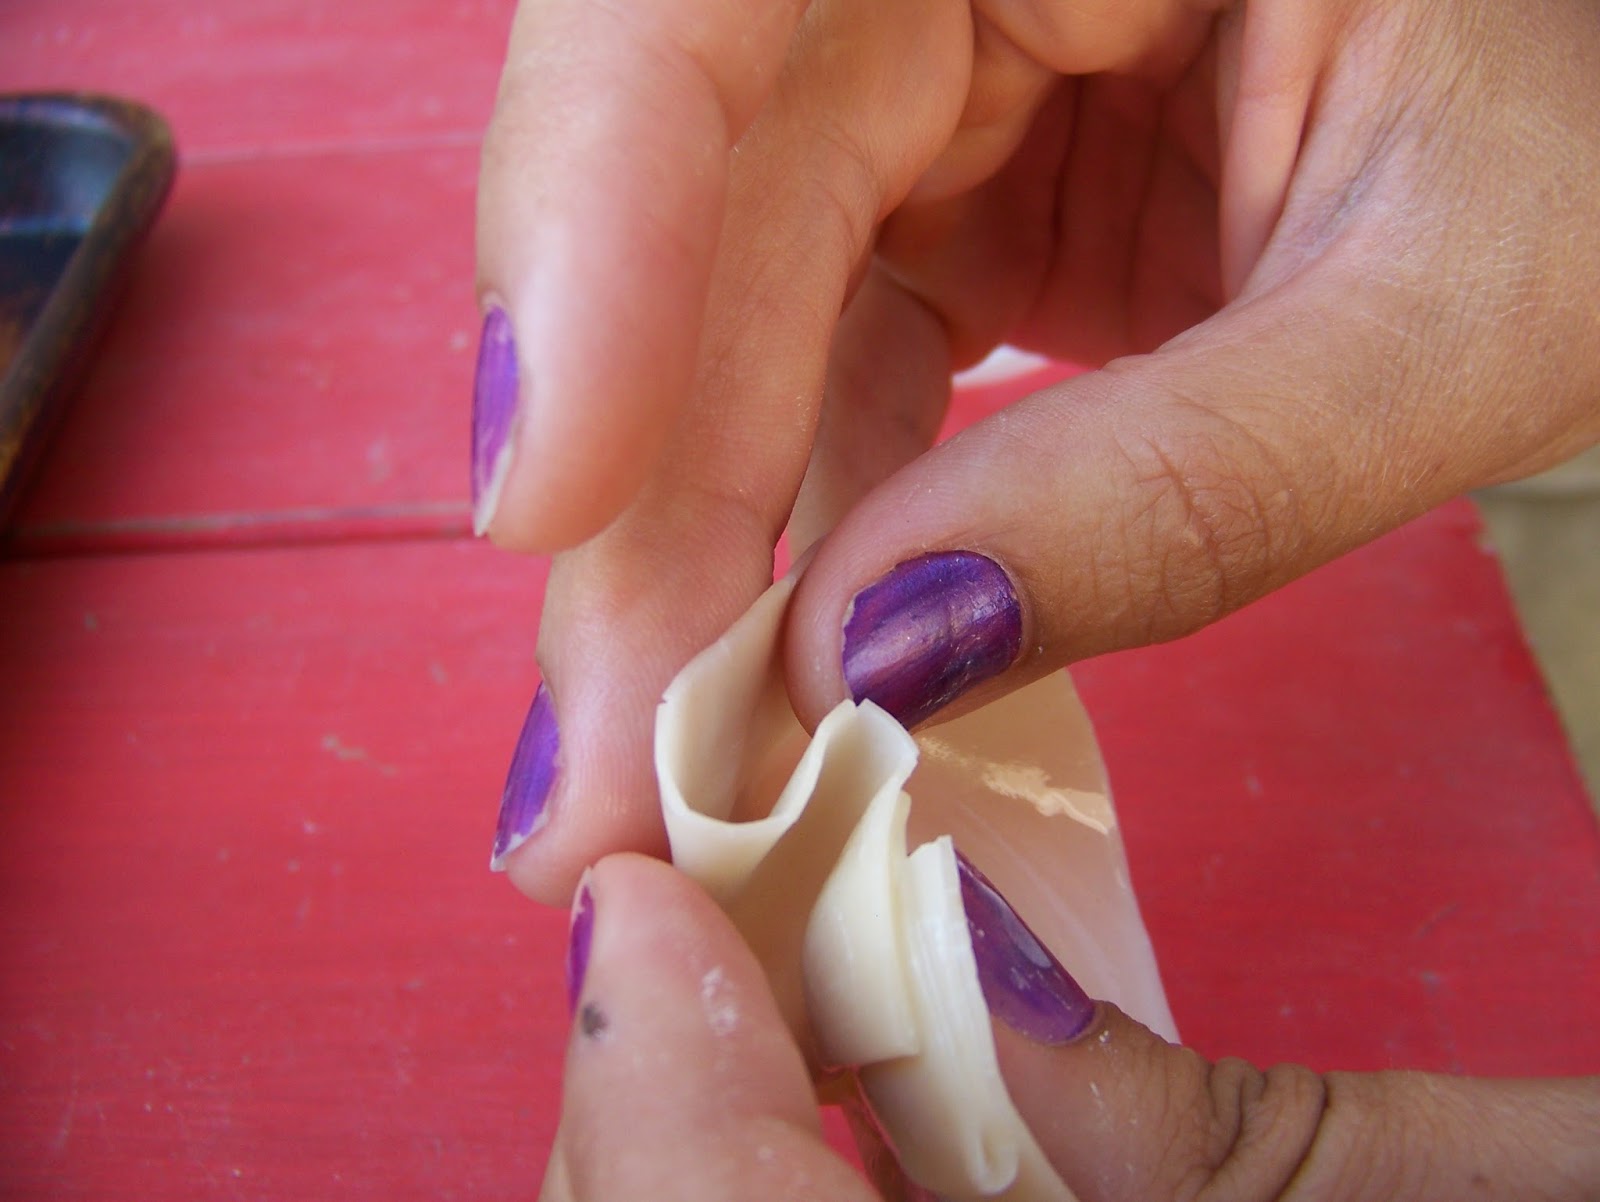
* Roll the pie crusts out and use a bowl or cup with a 4 1/2" opening to cut 12 'mini' circles (I got 4 mini circles from each crust, then put the scraps together and rolled it out so I could get four more).  Make 3 pleats in each mini circle and place in a muffin tin (see picture below).  Poke holes in the crust and bake at 425 for 7-8 minutes (until golden brown on the edges).  Move the 'cups' to a wire rack to cool completely.  In a medium saucepan, bring 1/2 C. water to a boil.  In a separate bowl, mix 1/2 C. cold water, sugar, cornstarch and salt together.  Add to the boiling water and whisk constantly until thickened, about 3 minutes (turn down the heat when it starts to thicken).  Add the jell-o and simmer another minute.  Remove from heat and stir in 1/4 C. lemon juice.  Leave it on a hot pad and stir it often to release the heat- you want it to cool to room temperature.  While it's cooling, peel and cut the peaches into bite sized pieces.  When the jello is cooled, mix in the peaches.  In a food processor, mix the cream cheese, powdered sugar and 1 tsp lemon juice together.  Fill each pie cup 1/3 full with the cream cheese, then top with the peach/gelatin.  Refrigerate until the gelatin has set.  Enjoy!


Tips
  • I put the cream cheese mixture in a Ziploc bag and piped it into the cups.
  • Put the gelatin in the fridge to help it cool faster- be careful though, you don't want it to set up before you've poured it into the pie cups.
  • I tried using peach flavored jell-o and didn't like it.  It may seem weird to mix orange flavor with the peach, but it's really good.  I have a sister that doesn't like peaches, so she tried strawberry jell-o and fresh strawberries- be creative!
  • I tried making my own pie crust, and decided store bought was much easier to work with and still tasted great.  Keep things simple.
  • Here's what my pan looked like before baking-just tuck those circles in- they don't have to be perfect:  Don't forget to poke holes in the crust before baking! 

August 27, 2013

Sweet Onion Vinaigrette


OK- I admit I was skeptical about trying this dressing when first introduced to it.  My mother-in-law was telling me about it and all I heard was 'onion' and 'vinegar'.  Hmm.  But one bite and I was a goner.  Ranch and I broke up and this vinaigrette has been my favorite dressing ever since.


RECIPE

1/2 small onion, chopped
1/2 C. Red Wine Vinegar
1 C. sugar
2 tsp ground mustard
1 tsp salt
2 tsp poppy seeds, toasted
1 C. Canola Oil


* Place all ingredients except for the oil in a blender and blend for 1 minute.  While it's still blending, slowly pour the oil in.  Use immediately on salads and refrigerate leftovers for up to four weeks.  Let the dressing sit for 15 minutes after coming out of the fridge, and stir it before using.  My favorite salad is below:

Salad
Red leaf lettuce
Toasted slivered almonds
Craisins
Parmesan Cheese
Texas Toast Seasoned Croutons
Grilled chicken breast
Sweet Onion Vinaigrette

Tips
  • This dressing is good with almost any salad combination.  I've even tossed it with some angel hair pasta before.
  • You don't have to add the poppy seeds, but it adds a little flavor and beauty.
  • It's best to use (dry) ground mustard, but if you don't have any on hand, substitute Dijon. 

August 25, 2013

Asian Chicken {30 minute dish}


I make this at least once a month.  It's my 'been running errands, gone all day, haven't been to the grocery store, dinner is in half an hour' meal.  It truly takes 30 minutes from start to finish and I always have the ingredients on hand.  We call it Asian Chicken, since it calls for Sriricha Chili Sauce.  It's sweet with a little bit of heat- can your taste buds handle it?!

Recipe

1 TBL Canola Oil
2 boneless skinless chicken breasts
1 clove garlic, minced
1/2 C. Yoshida's Original Gourmet Sweet & Savory sauce
1/2 C. chicken broth (low sodium)
1/2 C. brown sugar (packed)
1/2 TBL Sriracha Chili Sauce
1/4 C. chopped cilantro
1/2 C. chopped green onion
2 TBL cold water
2 TBL cornstarch

*Cut the chicken into large chunks.  Heat the oil in a large skillet and brown the chicken (don't cook it all the way thru).  Add the garlic and saute another 30 seconds.  Add the soy sauce, chicken broth, brown sugar and Sriracha and mix well.  Bring it to a boil, reduce heat and let it simmer five minutes.  In a small bowl, mix water and cornstarch together.  Turn up the heat (to medium) on the skillet and add the cornstarch, stirring constantly.  Simmer 2-3 minutes, until thickened.  Remove the pan from the heat and mix in the cilantro and green onion.  Serve over steamed rice.

Tips:
  • If I have enough time, I'll grill the chicken instead and make the sauce separate.  Same steps, just saute the garlic in 1 tsp oil (use the rest of the oil to rub on the chicken before grilling-season with salt and pepper).
  • If you want more heat, add more chili sauce.
  • We used 1 1/2 C. uncooked rice for this much sauce.  I have a rice cooker which makes it super easy. 
  • Youshida's Gourmet Sauce can be found at Costco.  It isn't as strong or as salty as Soy Sauce, which we like.  You can substitute Soy Sauce if needed.

August 23, 2013

Buttermilk Syrup


I begged my son to try this syrup- I knew he would love it.  But he wouldn't because in his mind 'syrup' was dark brown and came in a ready to pour plastic container.  He finally gave in after a huge bribe and tried one bite- breakfast has never been the same since.  Now he won't eat pancakes unless I make the "special syrup" (as he calls it).  It is amazing.  If you've never had it, make it, and you'll wonder how you've eaten breakfast without it before :)   


RECIPE

1 stick butter
3/4 C. sugar
1/2 C. buttermilk
1 tsp vanilla
1 tsp baking soda

*In a large saucepan, melt butter over medium heat.  Whisk in the sugar, then add the buttermilk.  Keep stirring (slowly) until it comes to a boil.  Boil for one minute then remove from the heat.  Stir in vanilla and baking soda- the syrup will foam up.  Use right away on pancakes or waffles.


Tips:
  • You can see the foam in the first picture.  It 'settles' within 10-15 minutes.  
  • This is a common recipe.  The only variation I've seen is adding Corn Syrup to help thicken it.  Corn Syrup is horrible for you so I try to avoid using it if possible.
  • Refrigerate leftovers in a mason jar and warm it up the next day. 
  • You can double or triple the recipe if feeding a large group.

August 21, 2013

Granola


Now this is a great way to start the day- oats and nuts mixed with a sweet syrup and baked until golden crispy.  I've met several moms that are shocked to find their kids like this homemade granola.  It has a great flavor so it's good plain or- my boys like it with milk or- my favorite is a fruit and yogurt parfait:


RECIPE

4 C. old fashioned oats
2 oz slivered almonds
2 oz chopped pecans
1 1/2 tsp cinnamon
1/2 tsp salt
1/3 C. honey
1/3 C. water
1/3 C. 100% pure maple syrup
1/4 C. Canola oil
2 BL brown sugar

* Preheat oven to 325.  In a large bowl, mix oats, nuts and cinnamon together and set aside.  In a medium sauce pan, bring remaining ingredients to a boil, stirring constantly.  Boil for one minute then remove from heat. Pour the syrup over the oat mixture and stir until everything is combined.  Spray a cookie sheet pan and spread the oats out until it's covered (you don't want big clumps-try to separate them as much as possible).  Bake for a total of 35 minutes- taking the pan out every 10 minutes and stirring the oats around so they won't burn.  (You'll do that 3 times.)  When done baking, move to a cooling rack, stir it around one more time, then let it cool completely.  Store in an air tight container up to 2 weeks.  


Tips:
  • Do not use quick oats- it will turn out mushy.  I have found this turns out better using higher quality oats- most things I'll buy the store brand, but for granola I always use Quacker.
  • 100% pure maple syrup is different than breakfast syrup.  It's usually at the top of the isle where the breakfast syrups are and is more expensive.  I've tried substituting breakfast syrup and didn't like it.  It's worth buying the pure stuff.  Don't worry- you'll make it again when you find your kids will eat it :)  
      (You can find it at Costco-it's a good price and will last a long time.) 
  • You can also add dried fruit after the granola is done cooling.  I love dried apricots and craisins.

August 19, 2013

Crepes


This week is dedicated to the most important meal of the day!  A good breakfast makes any day go better, especially a school day.  We usually ate cereal growing up, but now and then my mom would make a hot breakfast.  My favorite was strawberry crepes.


RECIPE

4 eggs
1 C. milk
3 TBL melted butter
3/4 C. flour
1/2 tsp salt
1 tsp sugar
1/2 tsp vanilla

* Start heating a large skillet on medium heat.  Put all the ingredients in a blender and blend for one minute.  Scrape down the sides and blend another 30 seconds.  Coat the pan with cooking spray and pour 1/2 C. batter into the skillet.  Lift the skillet up and twirl the batter around in a circle, spreading it out so it's thin.  Place it back on the heat to cook, flip with a spatula and let it finish cooking (doesn't take long).  Transfer to a plate and cover with a towel to keep warm.  My 10" skillet made 7 crepes.


Tips:
  • If you like your crepes super thin, use less batter.  1/2 C. was perfect for us.
  • Crepes cook fast, so move fast.  Twirling the batter takes a few seconds.  
  • I like cutting strawberries for the inside and making a "syrup" to go on top- grind 5-6 strawberries in a mini chopper with 1 tsp lemon juice and 1 tsp sugar.  My boys prefer maple syrup and powdered sugar.  There's no rules-it will taste good with just about anything.
  • I've seen recipes where you make a topping with cream cheese and heavy cream and lemon zest etc.  I'm not that fancy- Cool Whip is simple and easy.

August 17, 2013

Cinnamon Rolls


I'm pretty sure my son would eat these every day if he could.  These are his FAVORITE treat.  The day after I made them, he was walking around the kitchen.  "What are you looking for, bud?"  He wanted his cinnamon rolls.  Yeah, they were gone because I ate them all.  I fully admit that I have no self control when eating cinnamon rolls!

Cinnamon rolls aren't hard to make- just time consuming.  From start to 'in your mouth goodness' is about 2 1/2 hours- but most of that time is babysitting.  To me, cinnamon rolls are worth the time.  When you have that gooey warm frosted center melting in your mouth.......


....you seem to forget how long it took to make them!


RECIPE

Dough:  1/4 C. warm water
1 TBL yeast
1 TBL sugar
1 C. milk
1/4 C. butter
1 egg
1 tsp salt
1/4 C. instant vanilla pudding
4 C. bread flour

Filling:  1/4 C. butter, softened
1 C. packed brown sugar
2 tsp cinnamon

Frosting:  4 oz. cream cheese, softened
1/4 C. butter, softened
1 1/2 C. powdered sugar
1 1/2 tsp milk
1/2 tsp vanilla


* In a large bowl, whisk salt, pudding and flour together and set aside.  In a Kitchen Aid, using a dough hook attachment, combine the water, yeast and sugar.  Let that sit while you warm the milk and butter in a saucepan over medium low heat.  Stir occasionally- when the butter starts to melt, test the temperature with your finger.  I take it off when it's warm to the touch.  Pour it in with your yeast mixture.  Add the flour mixture and egg and knead for 5-8 minutes.  Form the dough into a ball and place in a greased bowl and cover with saran wrap.  Let rise until doubled in size.  Punch down and knead the remaining air bubbles out of the dough on a lightly floured surface.  Roll the dough into a 10X17" rectangle (I get a ruler out to make sure I'm pretty close).  Spread the butter over the top with your fingers, then the brown sugar, then the cinnamon.  Roll the long side up, jelly roll style, and pinch the seam together.  Using a long piece of floss, cut 21 rolls and place them in a greased 9X13 and 8X8 pan.  Cover and let them raise until they're touching (see the pictures below).  Bake at 350 for 12-15 minutes, turning half way thru (you want them golden brown on top).  Place on a cooling rack while you whip the frosting ingredients together.  Spread over the warm rolls and.....may the best man win!   

Rolled and cut.....

...and ready for the oven.  I put mine in while it's preheating.

Tips: 
  • Go slow when rolling up the dough.  You almost have to lift and tuck it at the same time to keep the brown sugar from getting pushed out.  Keep it as tight as possible.
  • My sister likes her cinnamon rolls thick, so she only cuts 12 (and bakes them a little longer).  I also like mine a little thicker (cause I love those gooey centers) so I only cut 19 and use a round cake pan instead of the 8X8.  
  • Using floss to cut the dough is a common trick, but just in case you've never done it- slide the floss under the dough, cross the ends over the top and pull down and out until it's straight again.  Cuts the rolls perfectly.  
  • Use a knife to make a small mark on the dough where it needs to be cut as a reference point.
  • We eat any leftovers for breakfast with scrambled eggs.

August 15, 2013

"French Bread"


My favorite after school treat was homemade bread.  Just the smell of fresh baked bread can cure a lot of things; eating it- now that does wonders for the soul!  My boys devour homemade bread.  If you don't bake a lot, no worries- this bread is super easy.  We call this "French Bread" at our house because of how it's shaped and the slits on top.


RECIPE

2 1/2 C. warm water
2 TBL yeast
3 TBL sugar
1 TBL salt
1/3 C. oil
6 1/2 C. bread flour

* In a Kitchen Aid (using the dough hook attachment), measure out the yeast and sugar.  Add the warm water (I put mine in a glass measuring cup and microwave it until it's warm, about 20-30 seconds) and let it sit for 5 minutes.  Add the salt, oil and flour.  Let it knead for 6-8 minutes.  Grease a large bowl.  Using a plastic spatula, scoop the dough out into your greased bowl.  Cover with saran wrap and let it rise until doubled in size (about 45 min).  Punch down the dough and knead out the remaining air bubbles on a floured surface; then divide the dough in half.  Roll the dough into a 10X13 rectangle.  Roll the long end up, jelly roll style, and pinch the seam together.  Place on a greased cookie sheet and pinch and tuck each end so it has a finished look.  Cut 4 diagonal slits 1/4" deep across the top with a sharp knife, egg wash and sprinkle with sesame seeds (optional).  Spray a piece of Saran wrap and cover the bread.  Repeat with the second piece of dough.  Let them raise until doubled in size (again, about 40 minutes).  Bake at 350 for 25-30 minutes.  Remove the bread from the pan immediately and place on a cooling rack.  Let it cool for 8-10 minutes before cutting.  


Tips:
  • Bread flour makes a difference.  If you don't have it, just use regular flour.  
  • Get a good seam so it will hold together while baking.  When I make bread with other people, they are always so gentle with the dough- I tell them bread doesn't have feelings- pinch away!  
  • For the egg wash, just mix an egg yolk and 1 tsp water together and gently brush it on the dough.  (I never do this step when I make it for our family cause I'm lazy.  As you can see from the pictures, I was lazy again!)  

    I never sprinkle cornmeal on the pan to cook the bread on-but you can if you want a more authentic feel to it.
  • We call this french bread even though it doesn't keep that hard outer shell after it bakes.  It softens (and wrinkles) as it cools.  You have to put a pan with water in the oven below the bread to get that crispy outer shell.
  • I'm weird about homemade bread- it has to be eaten out of the oven for that soul healing effect.  It's good for sandwiches the next day and makes great french toast on the third day.  If you haven't eaten it all by then, go feed the ducks!
  • You can half the recipe if it's just you and the hubby for dinner.
  • If you and bread don't get along, try this trick with Rhoades Rolls:      


We call them "little butt rolls"!  Grease a muffin tin well (on the top too).  Put 2 dough balls in each cup.  
Cover and let it raise until the rolls are almost touching each other (mine took about 5 hours).
  Turn the oven on to 350 and put the rolls in while it's preheating.  Bake for 12-15 minutes.  Dump them out on the counter then place on a cooling rack.  Kids love these cause they pull apart.  My husband prefers these to homemade rolls-must be the kid in him :)

August 14, 2013

Frosted Banana Bars


I haven't met anyone who doesn't love these.  Serious.  They get gobbled up wherever I take them.  What's comical is how people react when I tell them they're banana bars- they get this skeptical look on their faces.  To be polite, they try one and pretty soon they're licking their fingers clean- they take another one......and pretty soon they want the recipe!  You might have a hard time getting your kids to eat only one or two bars- good luck!


RECIPE

1 stick butter, softened
2 C. sugar
3 eggs
1 1/2 C. mashed bananas (I use 5-6 "rotten" bananas)
1 tsp vanilla
2 C. flour
1 tsp baking soda
1/4 tsp salt
1/2 C. chopped pecans (optional)

* In a large bowl, cream butter and sugar together.  Add the bananas, eggs and vanilla.  In another bowl, whisk flour, soda and salt (and nuts) together then add to the banana mixture.  Pour batter into a greased cookie sheet and bake at 350 for 16-18 minutes (or until a toothpick comes out clean).  Let the bars cool completely before frosting. 

Frosting
1 stick butter, softened
6 oz cream cheese, softened
4 C. powdered sugar
2 tsp vanilla

*Cream the butter and cream cheese together- add vanilla, then add the powdered sugar 1 cup at a time.  Beat until everything is well combined and creamy.  Spread over the banana bars, cut and serve. (If you don't like nuts in the bars, sprinkle them on top).

Tips:
  • Your bars will have a better flavor the more 'rotten' your bananas are.  
  • Frosting always turns out perfect when the butter and cream cheese have been sitting out for at least an hour.  You don't want chunks of either one in your frosting.  If you forgot to set them out and don't have time, cream everything together in a food processor.

August 12, 2013

Easy Fruit Smoothies


With school starting soon, I'm dedicating this week to 'after school treats'.  I salute my mother who had a treat waiting for us kids everyday- it gave me something to look forward to and made the horrible, no good, very bad days brighter.  That little tradition has stayed with me and I find those little treats keep my boys from starving until dinner time and let them know I thought about them that day.  
These smoothies are a frequent request from my boys.  They are super easy and fast- only 3 ingredients!


RECIPE

3 C. mixed frozen fruit (from Walmart)
1 1/2 C. juice (see tip)
1 banana

*Place all the ingredients in a blender and blend on high for one minute.  Serve immediately.


Tips:
  • We trade off between Passion Orange, Mango Orange, or my favorite is the Pineapple Mango- I've only been able to find that one at Winco.  It comes in a blue can.  Make the concentrate into juice then add it to the smoothie.


  • My boys don't like berries in smoothies because of the seeds.  This fruit blend is our favorite.
  • I don't like adding ice to smoothies because it makes it too bland.  The frozen fruit gives it enough of that frozen texture for us.  

August 10, 2013

Pot Stickers


Sous chef Cortney was in town and we decided to make pot stickers.  You don't make pot stickers unless you have help- they're super easy to make, but take a lot of time.  Your chances of wanting to make them again go way up if you have someone to chat with- making the never ending experience enjoyable.  Pot stickers are a great way to use up summer cabbage.  They freeze beautifully which means all your hard work can be enjoyed for future dinners.

I did experiment with the cabbage process.  Normally, you chop the cabbage, mix it with some salt, let it sit for 5-10 minutes, then squeeze the heck water out of it.  I'm a natural at making huge messes in the kitchen, so any step that intensifies that talent is not good!  There's a lot of water in cabbage- I got almost 2 cups out when I squeezed mine.  I talked to a few people who told me they skipped that step and their pot stickers turned out fine.  I tried using the coleslaw blend- it was fast and easy.  The cabbage is dried out from packaging so you don't have to remove any moisture, but it's stiff which makes it a little harder to mold into the wrappers.  (I would probably pulse it a few times in the food processor just to soften it).  Well, I'm going to be traditional, but experiment and see what works best for you.

RECIPE

1 head of cabbage
4 green onions, chopped
1 lb. ground pork
1 TBL fresh grated ginger
2 tsp sesame oil
2 TBL soy sauce
1 tsp salt
1/2 tsp white pepper
1 TBL sugar
1 tsp olive oil
2 packages circular won ton wrappers

* Do a rough chop on the cabbage and put it in the food processor- pulse it until you have small pieces.  (Chop it in 3 or 4 'batches'.  Be careful how fine you chop the cabbage- you don't want a puree).  Put the cabbage and salt in a large bowl and let it sit while you measure out the remaining ingredients (except the won ton wrappers) into another bowl.  Use your hands to squeeze the water out of the cabbage; put the cabbage in with your pork/seasonings and mix by hand until everything is combined.  Get a small bowl of cold water.  Dip your fingers in the water and spread it around the edge of the won ton wrapper.  Press three pleats in it to create a "shell".  Place a small spoonful of pork mixture into the 'shell' and press the wrapper closed.  See the pictures below.  Place the pot stickers on a cookie sheet until your done wrapping  (cover them so they don't dry out).  Heat 2-3 tsp canola oil in a sauce pan.  Rub the bottom of each pot sticker in the oil and place them so they aren't touching each other.  Pour in 1/2- 3/4 cup water-(You want about 1/4 of the pot sticker covered in water).  Cover, bring to a boil and let them simmer until all the water has evaporated (about 7-10 minutes).  Remove the lid and let them simmer a few more minutes until the bottoms get crispy.  Serve with soy sauce.

OK-let's go through this again :)  Spread some water with your fingers around the edge of the wrapper.

 Fold it so the 'wet' side becomes the inside of the pot sticker.  Follow the pictures to make your 3 pleats.


 Add more water as needed to make sure it sticks well.


Now you have your "shell".  Hold it in your fingers like so while filling it.

(This picture has the coleslaw blend filling.)


You want to make sure they stand up like this so they cook right.
Don't worry- you'll be a pro by the time you're done!

Tips:
  • Only pull a few wrappers out at a time so they don't dry out.
  • If you choose to go with the packaged cabbage route- use 2 bags
  • My sister adds 1/4 C. oyster sauce to hers- add it if you like that fishy flavor.
  • Have someone help you-seriously.  It will take an hour to wrap them.
  • You will have leftovers- you MUST freeze them.  Pot stickers get their name because they STICK well.  If you try to refrigerate them, they'll turn into a blob like this:  
    Leave the extras on the cookie sheet and freeze for several hours.  (I accidentally left them overnight once, and they were fine).  Put them in a freezer bag and freeze up to 2 months.  They don't need to thaw before cooking.  
  • Use 2 pans if you need to make a lot for your family.  My 10" skillet could cook 15 pot stickers.
  • In the first picture, you'll see those brown 'veins'- it's just cooked starch from the wrapper.
  • I know a lot of people spice up the dipping sauce, but I like plain soy sauce..  I'm tired by the time I'm done making these so I do what's fast and easy.
  • You probably won't use all the won ton wrappers- freeze them for the next time you make pot stickers, or fry them up for a salad.