August 12, 2013

Easy Fruit Smoothies


With school starting soon, I'm dedicating this week to 'after school treats'.  I salute my mother who had a treat waiting for us kids everyday- it gave me something to look forward to and made the horrible, no good, very bad days brighter.  That little tradition has stayed with me and I find those little treats keep my boys from starving until dinner time and let them know I thought about them that day.  
These smoothies are a frequent request from my boys.  They are super easy and fast- only 3 ingredients!


RECIPE

3 C. mixed frozen fruit (from Walmart)
1 1/2 C. juice (see tip)
1 banana

*Place all the ingredients in a blender and blend on high for one minute.  Serve immediately.


Tips:
  • We trade off between Passion Orange, Mango Orange, or my favorite is the Pineapple Mango- I've only been able to find that one at Winco.  It comes in a blue can.  Make the concentrate into juice then add it to the smoothie.


  • My boys don't like berries in smoothies because of the seeds.  This fruit blend is our favorite.
  • I don't like adding ice to smoothies because it makes it too bland.  The frozen fruit gives it enough of that frozen texture for us.  

August 10, 2013

Pot Stickers


Sous chef Cortney was in town and we decided to make pot stickers.  You don't make pot stickers unless you have help- they're super easy to make, but take a lot of time.  Your chances of wanting to make them again go way up if you have someone to chat with- making the never ending experience enjoyable.  Pot stickers are a great way to use up summer cabbage.  They freeze beautifully which means all your hard work can be enjoyed for future dinners.

I did experiment with the cabbage process.  Normally, you chop the cabbage, mix it with some salt, let it sit for 5-10 minutes, then squeeze the heck water out of it.  I'm a natural at making huge messes in the kitchen, so any step that intensifies that talent is not good!  There's a lot of water in cabbage- I got almost 2 cups out when I squeezed mine.  I talked to a few people who told me they skipped that step and their pot stickers turned out fine.  I tried using the coleslaw blend- it was fast and easy.  The cabbage is dried out from packaging so you don't have to remove any moisture, but it's stiff which makes it a little harder to mold into the wrappers.  (I would probably pulse it a few times in the food processor just to soften it).  Well, I'm going to be traditional, but experiment and see what works best for you.

RECIPE

1 head of cabbage
4 green onions, chopped
1 lb. ground pork
1 TBL fresh grated ginger
2 tsp sesame oil
2 TBL soy sauce
1 tsp salt
1/2 tsp white pepper
1 TBL sugar
1 tsp olive oil
2 packages circular won ton wrappers

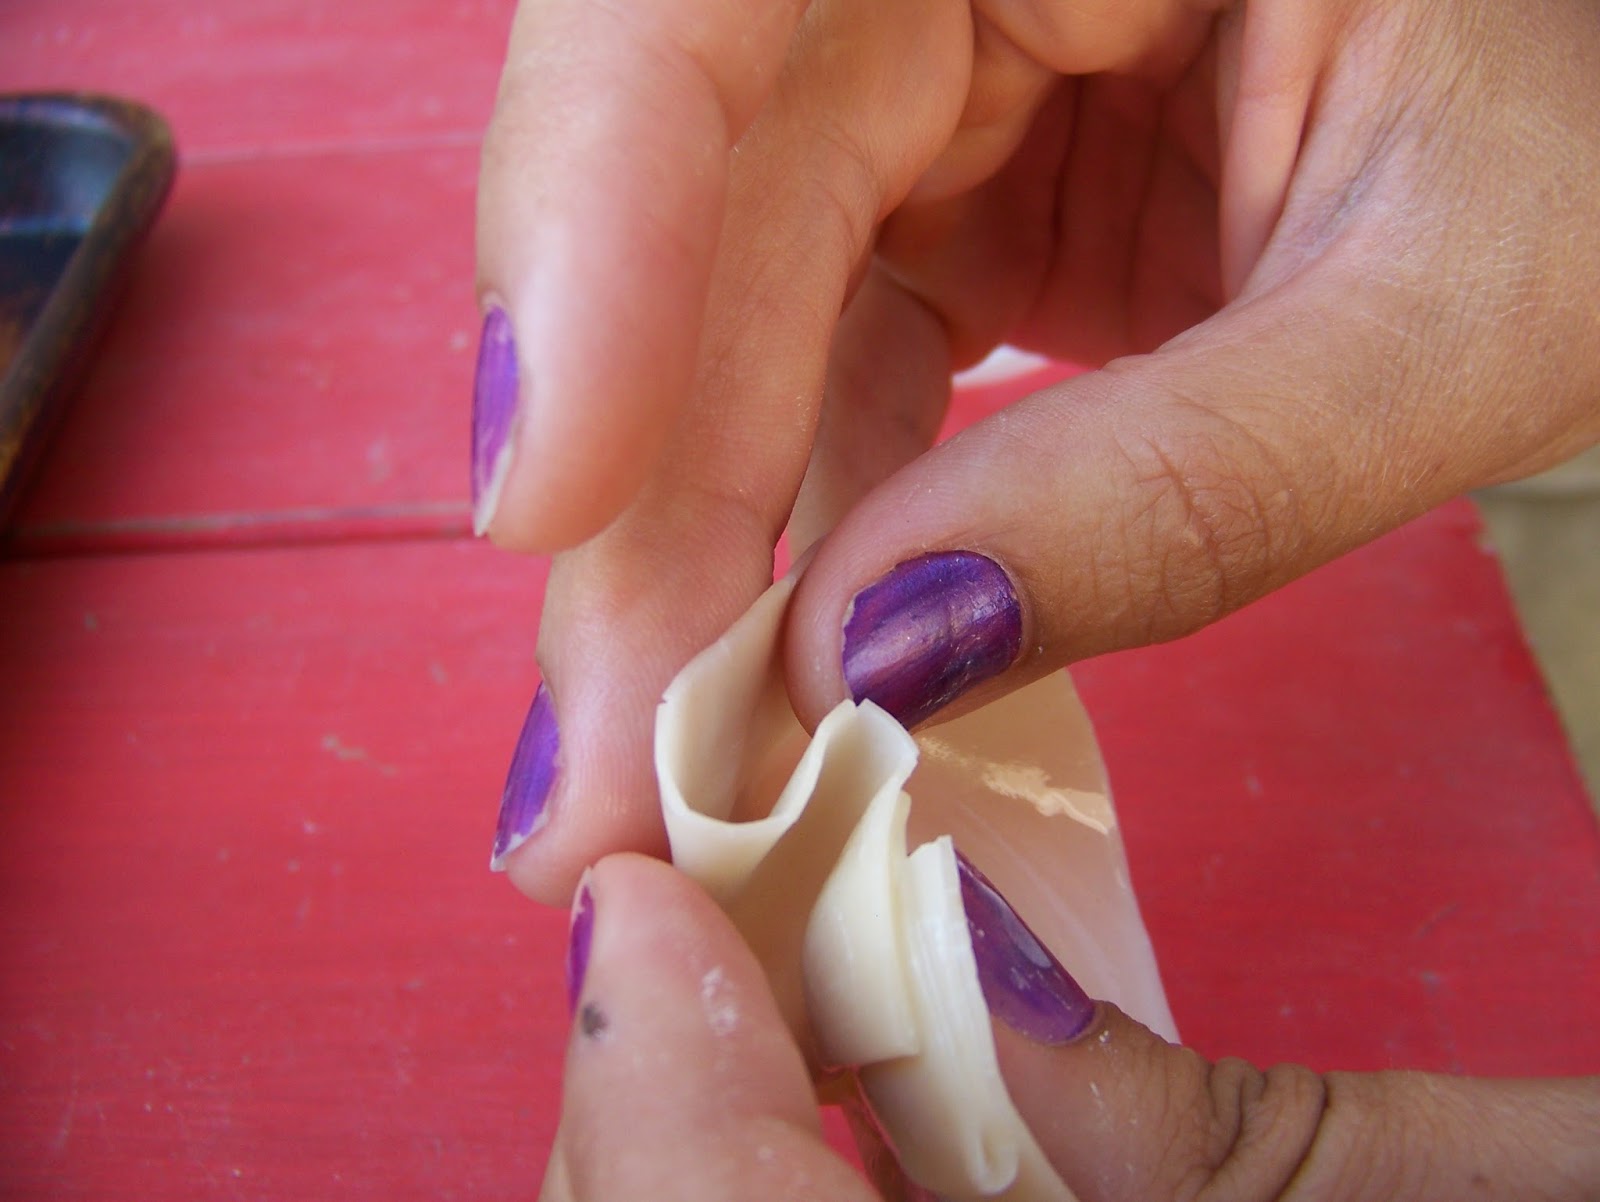
* Do a rough chop on the cabbage and put it in the food processor- pulse it until you have small pieces.  (Chop it in 3 or 4 'batches'.  Be careful how fine you chop the cabbage- you don't want a puree).  Put the cabbage and salt in a large bowl and let it sit while you measure out the remaining ingredients (except the won ton wrappers) into another bowl.  Use your hands to squeeze the water out of the cabbage; put the cabbage in with your pork/seasonings and mix by hand until everything is combined.  Get a small bowl of cold water.  Dip your fingers in the water and spread it around the edge of the won ton wrapper.  Press three pleats in it to create a "shell".  Place a small spoonful of pork mixture into the 'shell' and press the wrapper closed.  See the pictures below.  Place the pot stickers on a cookie sheet until your done wrapping  (cover them so they don't dry out).  Heat 2-3 tsp canola oil in a sauce pan.  Rub the bottom of each pot sticker in the oil and place them so they aren't touching each other.  Pour in 1/2- 3/4 cup water-(You want about 1/4 of the pot sticker covered in water).  Cover, bring to a boil and let them simmer until all the water has evaporated (about 7-10 minutes).  Remove the lid and let them simmer a few more minutes until the bottoms get crispy.  Serve with soy sauce.

OK-let's go through this again :)  Spread some water with your fingers around the edge of the wrapper.

 Fold it so the 'wet' side becomes the inside of the pot sticker.  Follow the pictures to make your 3 pleats.


 Add more water as needed to make sure it sticks well.


Now you have your "shell".  Hold it in your fingers like so while filling it.

(This picture has the coleslaw blend filling.)


You want to make sure they stand up like this so they cook right.
Don't worry- you'll be a pro by the time you're done!

Tips:
  • Only pull a few wrappers out at a time so they don't dry out.
  • If you choose to go with the packaged cabbage route- use 2 bags
  • My sister adds 1/4 C. oyster sauce to hers- add it if you like that fishy flavor.
  • Have someone help you-seriously.  It will take an hour to wrap them.
  • You will have leftovers- you MUST freeze them.  Pot stickers get their name because they STICK well.  If you try to refrigerate them, they'll turn into a blob like this:  
    Leave the extras on the cookie sheet and freeze for several hours.  (I accidentally left them overnight once, and they were fine).  Put them in a freezer bag and freeze up to 2 months.  They don't need to thaw before cooking.  
  • Use 2 pans if you need to make a lot for your family.  My 10" skillet could cook 15 pot stickers.
  • In the first picture, you'll see those brown 'veins'- it's just cooked starch from the wrapper.
  • I know a lot of people spice up the dipping sauce, but I like plain soy sauce..  I'm tired by the time I'm done making these so I do what's fast and easy.
  • You probably won't use all the won ton wrappers- freeze them for the next time you make pot stickers, or fry them up for a salad.

August 7, 2013

Lemon Cake


I love the part in My Big Fat Greek Wedding where the in-laws bring a bundt cake and the Greek mama tells her family, "There's a hole in this cake!"  She brings it out later with a flower in the middle and proudly announced that she fixed it.  I so wanted to put a flower in the middle of mine for the picture :)

If you love lemon flavor- this cake is for you.  It's delish and super easy to make.


RECIPE

1 lemon cake mix
1 (3 oz) box lemon jell-o
3/4 C. oil
3 eggs
1/4 C. Lemon juice
2 C. powdered sugar

* Boil lemon jell-o in 1 1/4 cups water.  Let it cool for 15 minutes.  In a large bowl, whisk eggs and oil together.  Add the cake mix, then jell-o mixture and whisk well.  Spray a 9X13 pan and pour the batter in.  Bake at 350 for 30-35 minutes (or until a knife comes out clean).  Mix the lemon juice and powdered sugar together.  Poke several holes in the cake with a fork, then pour the glaze over the top.  Let the cake cool completely before serving.  Best with whipped cream.

Variation 1: Bundt cake- spray and flour the pan well.  Cook for 30-35 minutes.  I turned mine over a few minutes after I took it out of the oven.  Don't poke any holes- just pour the glaze on top so it stays pretty.  I poured half the glaze over it when the cake was warm, and again when it had cooled.  Put a flower in the middle- J/K!

Variation 2: Sheet cake- spray and flour a cookie sheet.  Bake for 15-18 minutes.  Poke holes all over the top and pour the glaze over.  Top with whipped cream.  Make it sheet cake style when you're feeding a crowd.

Tips:
  • Go slow and be gentle when poking holes in the cake-otherwise you'll tear it up.  My sister wasn't patient enough once and the cake looked like she had taken a rototiller to it. 
  • The whipped cream helps hide the holes on top :)  
  • The bundt cake is by far the most beautiful but it has a slightly different texture since the glaze doesn't soak into the cake.  It won't be quite as moist as making it the other way.
  • The cake is great plain, but my favorite is serving it with crushed strawberries and whipped cream- a mock strawberry shortcake.


August 5, 2013

Cheesecake Jell-O


We love our mother, but there is a strict rule all us kids agree to- NEVER let mom cook!  She breaks that rule now and then when we're not watching her carefully enough.  One afternoon I gathered the things needed to make this jell-o when she proudly announced that she had already made it.  My sister and I gave each other "the look" and investigated the fridge.  Sure enough, there on top was the cheesecake jell-o.  The crust layer had huge junks of cracker in it- "Mom, how did you grind the crackers up?"  "Oh, I just put them in a Ziploc bag and hit them with the rolling pin".  Hmm.  "Mom, how did you make the cream cheese mixture?"  "Oh, I just cut junks of cream cheese up and mixed everything with a potato masher."  Hmm.  "Mom- where's the jell-o?"  Oh, I couldn't find any, so I just cut some strawberries up and put them on top.  I wish we had taken a picture-you can probably imagine what it looked and tasted like :)

 I think my boys love cheesecake jell-o because it's like having dessert with dinner.  Isn't that against the rules!  You could serve it as a dessert, but your kids will think you're 'totally cool' if it's part of dinner.  It adds beauty and sweetness.


RECIPE

1 1/2 packages graham crackers (the packages in the box)
1 stick butter, melted
2 TBL + 1/4 C. sugar, divided
8 oz cream cheese
1 container frozen whipped cream
1 (6 oz) box raspberry jell-o 
1 small bag frozen berries

* Dissolve jell-o in 2 cups boiling water.  Add only 1 cup cold water and set aside to cool.  In a food processor, grind graham crackers until fine crumbs.  In a large bowl, melt butter; add 2 TBL sugar and mix together with a fork.  Add graham cracker crumbs and mix until everything is moist.  Press the crumbs into the bottom of a 9X13 pan and then stick it in the freezer while you mix the next layer.  Use the food processor again to mix the remaining sugar, cream cheese and whipped cream together.  Scrape down the sides and mix until everything is smooth.  Spread the cream mixture on top of the graham cracker layer and place it back in the freezer for about five minutes.  Mix the frozen berries with the jell-o.  Gently pour the jell-o over the cream layer and refrigerate until the jell-o has set.  (Cover it with Saran wrap about an hour after you put it in the fridge).

Tips:
  • I usually put this in a clear 9X13 pan, but it worked well in the Trifle dish.  It's pretty when you can see all the layers.
  • I know a lot of people make something similar with pretzels on the bottom- I personally like the flavor of the graham cracker crust better.  
  • Make sure you let the crackers grind long enough-it's almost like a powder:
    Using the food processor for the cream mixture makes it so you don't have to soften anything.  It blends everything coming right out of the fridge and freezer perfectly.  If you don't own a food processor- it's worth buying.  I use mine every week.  Walmart has an off brand that works well and it's only $35.
  • Make sure the cream mixture seals off the crust layer.  If the jell-o seeps through it will make the crust soggy.  
  • Mix it up by using strawberry or cherry jell-o.  Now and then we'll use peach jell-o with frozen peaches on top- that's a fun variation.
  •  My boys won't eat the berries, so I leave them out when I make it for our family- so sad because the berries make it beautiful (and somewhat healthy).                                                                                                       

August 1, 2013

Fried Scones


I put a plate of scones I had just fried on the counter between my mom and I.  There were five scones on the plate to be exact.  She ate one and commented on how wonderful it was.  Well, you can never eat just one, so she had another.  She went to grab a third and said, "Last one!"  A minute went by and she kept eyeing the last two.  Temptation gave in and she grabbed the fourth-"Last one- promise!"  She gobbled that one down and now that lonely last scone was calling to her.  We looked at each other, then the scone, then back at each other.  I'm not sure what she was thinking, but I had that look that said, Dare ya.  She ate it- no joke!  Five scones in five minutes- I'm pretty sure that's a record!

That's the only problem with these scones-they're irresistible.  You eat one and tell yourself "that's it".  Then somehow you talk yourself into eating another, but only on the terms that it's your last.  Before you know it, you're eating another one (and of course it's going to be your last)!  If you eat more than five, you hold the record :)


RECIPE

1 quart buttermilk
2 TBL yeast
2 TBL sugar
1/4 cup warm water
2 eggs
2 TBL oil
8 C. flour
1 TBL Baking Powder
1/2 tsp Baking Soda
1 1/2 tsp Salt

* In a Kitchen Aid, combine water, yeast and sugar.  Let that set while you warm the buttermilk in a large sauce pan.  Remove the milk from the heat when it is warm to the touch (I stick my finger in it to test it).  Add eggs, oil and milk to the yeast mixture.  Combine half the flour with the remaining ingredients, then add to the dough mixture.  Add the remaining flour and let it knead for about five minutes, or until all the flour is incorporated.  Put the dough in a large greased bowl or Tupperware container.  Put it in the fridge and let it raise at least all day, preferably overnight.  Heat oil in a large pot to 375 degrees (I have an electric fryer which makes this so much easier).  Heavily flour a counter surface, grab a large handful of dough and roll in in flour until it's all covered.  Roll it out to about 1/4" thick and cut with a pizza cutter into desired shape/size.  Fry for about 3-4 minutes on each side, or until golden brown (they'll bubble up when frying).  Remove onto a paper towel or cooling rack (see tip below).

Eat them hot with honey butter............


...............or make them into (Mock) Navajo Tacos..........


.......or dip them in cinnamon sugar (this is my personal favorite!)


Tips:
  • Don't let the buttermilk get hot- you don't want to cook the eggs.  Warm to the touch is perfect.
  • The dough doesn't have a lot of oil since it's fried in oil- so it's super sticky.  Cooled dough is easier to work with and make sure you use lots of flour when rolling it out.


  • It will continue to raise in the fridge- a large Tupperware bowl that has a lid is the best.  If you don't have one, just separate the dough into 2 bowls and cover tightly with saran wrap.
  • It makes a lot of scones- I forgot to count, but somewhere between 40-50.  I usually make this recipe when we have a family gathering so there's never leftovers.  My friend halved the recipe and it worked great.  You can refrigerate the dough for at least 3-4 days; I'll save my oil and make fresh scones during that time.
  • I put a cooling rack on top of a cookie sheet and set my scones on that after coming out of the fryer.  It lets excess oil drip off and keeps them crisp.
     If I'm frying a bunch and need to keep them warm, I'll turn the oven on to the lowest temperature setting.  When it's done preheating, I'll turn it off- you just want to create a 'warming zone' to keep the finished scones in.  
  • For the cinnamon/ sugar I mixed 1/2 cup sugar and 1 tsp cinnamon together.  I let the scones cool for 1-2 minutes after coming out of the fryer, then dip them in the sugar mixture.  They taste like doughnuts!
  • I have family that like their scones a little thicker- just make sure you fry them long enough to cook the inside.